Discovering Victorian Gothic grandeur and the final resting place of a confectionery legend on the hillsides of Halifax.

The Spire Over the Valley
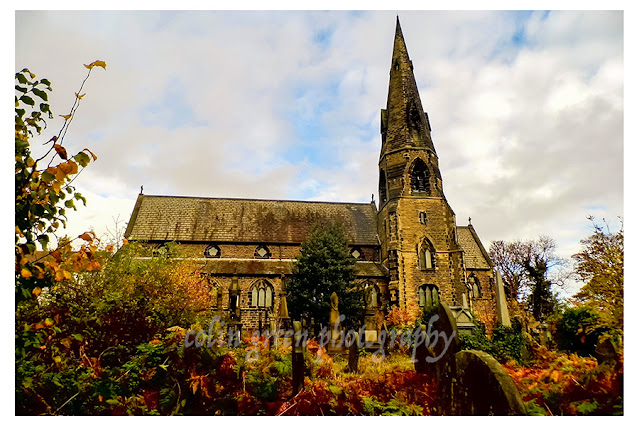
If you drive along the valley bottom south of Halifax, your eye is inevitably drawn upwards to a needle-sharp stone spire piercing the skyline. It belongs to All Saints Church in Salterhebble, a building that has stood sentinel over this industrial landscape since the mid-19th century.
To walk through its churchyard today, especially amid the rust-coloured bracken and bare trees of winter, is to step back into a time when Halifax was a powerhouse of the Victorian textile industry. It is a place of immense atmosphere, where the roar of modern traffic fades away, replaced by a quiet solemnity and architectural beauty.
 |
| The imposing spire of All Saints, framed by winter branches against a crisp blue sky. This vertical composition perfectly captures the church's dominance over the landscape. |
Architects of the Textile Boom
All Saints Church was consecrated in 1858. It was born out of necessity; the industrial revolution had swelled the local population, and the existing chapels could no longer cope.
The church was designed by the architectural partnership of Mallinson & Healey. If you look closely at churches across West Yorkshire, you will frequently find their names. They were the go-to architects for the region's booming mill towns, masters of the "Gothic Revival" style. They didn't just build functional spaces; they built statements of civic and religious pride, designed to emulate the soaring spirituality of medieval cathedrals, constructed from durable local stone.
The church is large, dignified, and solid—a perfect reflection of the confident era in which it was built.
 |
| The imposing spire of All Saints, framed by winter branches against a crisp blue sky. This vertical composition perfectly captures the church's dominance over the landscape. |
 |
| Presented in sepia, the textures of the local stone construction and the rhythmic pattern of the lancet windows are brought to the fore. |
Victorian Views on Death and Status
TheVictorians did not hide away from death; they celebrated it with elaborate rituals and grand monuments. A person’s status in life was often reflected by the size of their memorial in death. All Saints churchyard is a fascinating necropolis, filled with the graves of mill owners, merchants, and the professionals who kept the town running.
While many stones are now leaning, reclaimed by ivy and tall grass, others remain starkly impressive. The grounds feature several significant "chest tombs" and mausoleums—above-ground burial chambers designed for wealthy families who wanted to ensure their legacy was visible long after they were gone.
 |
| Victorian funerary grandeur. This large, ornate chest tomb, featuring intricate carvings and cusped arches, indicates a family of significant wealth and local standing. |
A Sweet Slice of History: The Mackintosh Grave
Among the hundreds of weathered stones, there is one that holds a particular fascination for anyone interested in Halifax's commercial history—and anyone with a sweet tooth.
Tucked away in the churchyard is the family grave of John Mackintosh (1868–1920).
Known internationally as "The Toffee King," Mackintosh began his confectionery empire right here in Halifax. Starting with a small pastry shop, his unique blend of brittle English toffee and soft American caramel revolutionized the sweets industry. His company would eventually give the world beloved brands like Quality Street, Rolo, and Toffee Crisp. Standing before his modest but dignified memorial is a direct connection to a global business empire born in this very parish.
 |
| The final resting place of the "Toffee King." The inscription for John Mackintosh, J.P. (Justice of the Peace), is clearly visible in this black and white photograph. |
Atmosphere and Shadow
There is a distinct mood to All Saints that changes with the light. On a bright day, the warm Yorkshire stone glows against the blue sky. But when the clouds roll in, or when viewed through the lens of black and white photography, the church takes on a brooding, gothic atmosphere.
The interplay of shadow against the heavy masonry creates a sense of drama, highlighting the intricate carvings and the sheer weight of the history contained within these walls and grounds.
 |
| High drama and deep shadows. This monochrome shot captures a large mausoleum nestled against the church walls, emphasizing the gothic atmosphere of the site. |
Visiting All Saints
All Saints, Salterhebble, remains a functioning place of worship and a vital part of the local community. When visiting the churchyard to explore its history and architecture, visitors are encouraged to remain respectful of the site as an active burial ground and a place of quiet reflection.
It is a location that rewards a slow walk and a keen eye, offering a profound connection to the generations that built the Halifax we know today.

I took these pictures on the 24th November 2023 with a Nikon d3300, clicking any of them should open a link in another window to my Colin Green Photography store on Zazzle.
Please take a moment to share this post, follow me on social media, and explore my work on Clickasnap and Photo4Me using the links below. Your support means a lot!


. ©Colin Green")